Master the Spin: The E-commerce Guide to 360 Product Photography for Amazon and Shopify
The ROI of the 'Virtual Touch': Why 360 Photography is Mandatory in 2026
Shoppers can't pick up your product. They can't turn it over, check the stitching, or test the weight in their hand — and that tactile gap is costing e-commerce brands real revenue every single day. Static images only partially address the issue.
360 product photography closes that gap by delivering what no flat image can: a complete, interactive visual experience that mimics physical handling. When a customer can spin a product, inspect every angle, and zoom into surface detail, they're not just browsing — they're making an informed purchase decision. That's the virtual touch, and it fundamentally changes buyer confidence. For those looking to enhance their product presentations, consider a 360 Product Photography Service to achieve professional results.
The numbers back this up. According to data from Orbitvu, interactive 360 views increase conversion rates by an average of 10% to 30%. This represents a significant shift in revenue for any product catalog. To dive deeper into how interactive photography impacts sales, check out The 360 Advantage: Why Interactive Product Photography is the New Standard for High-Conversion E-Commerce.
Interactive imagery doesn't just drive conversions; it manages expectations — and managed expectations mean fewer "item not as described" returns.
In practice, detailed visual inspection through 360 spins directly reduces return rates by giving customers the clarity they need before they hit Buy Now.
Pairing the right 360 product photography software with a smart production workflow is where that ROI becomes repeatable and scalable. Before you can capture it, though, you need to understand exactly what each platform demands — and that starts with auditing your requirements. For a comprehensive overview of the process, refer to 360 Product Photography.
Step 1: Audit Your Platform Requirements (Amazon vs. Shopify vs. DTC)
Before you shoot a single frame, you need to understand where that content is going to live — because Amazon, Shopify, and DTC sites each play by different rules. Jumping into production without this audit is one of the most common (and costly) mistakes brand managers make. Platform requirements should drive your capture decisions, not the other way around. For businesses in Texas, Interactive Product Photography Insights offers insights into how local brands are leveraging these techniques to stay ahead.
| Platform | Requirements | Limitations |
|---|---|---|
| Amazon | 24, 48, or 72 frames; Brand Registry required | Limited to approved sellers; no custom viewer |
| Shopify | Native 3D (GLB/USDZ); 360 spin via third-party apps | Spin requires additional app install and optimization |
| DTC / Custom | Flexible; depends on your stack and CDN | Mobile performance is a critical constraint |
| WooCommerce | Plugin-dependent (e.g., 360-degree spin plugins) | Inconsistent mobile rendering across themes |
Amazon 360 View Requirements: What Brand Registry Means in Practice
Understanding Amazon 360 view requirements is non-negotiable before you invest in production. Amazon typically requires a structured sequence of 24, 48, or 72 frames — and critically, this feature is locked behind Brand Registry enrollment. If your brand isn't registered, uploading a spin sequence simply won't work. Verify your eligibility first; otherwise, you're producing assets you can't publish.
Shopify and DTC: A Tale of Two Formats
Shopify natively supports 3D models in GLB or USDZ format, but if you want a classic 360-degree spin viewer, you'll need a third-party app from the Shopify App Store. These aren't the same experience — 3D models allow free rotation, while spin sequences deliver a more controlled, cinematic feel. For DTC sites, mobile performance adds another layer of complexity. Heavy spin files can drag load times down significantly, so image compression and lazy loading aren't optional extras.
WooCommerce users face a similar decision, relying on plugins that vary widely in quality and mobile rendering reliability — always test across devices before going live.
With your platform requirements mapped out, the next step is assembling the right gear to capture footage that actually meets those specs.
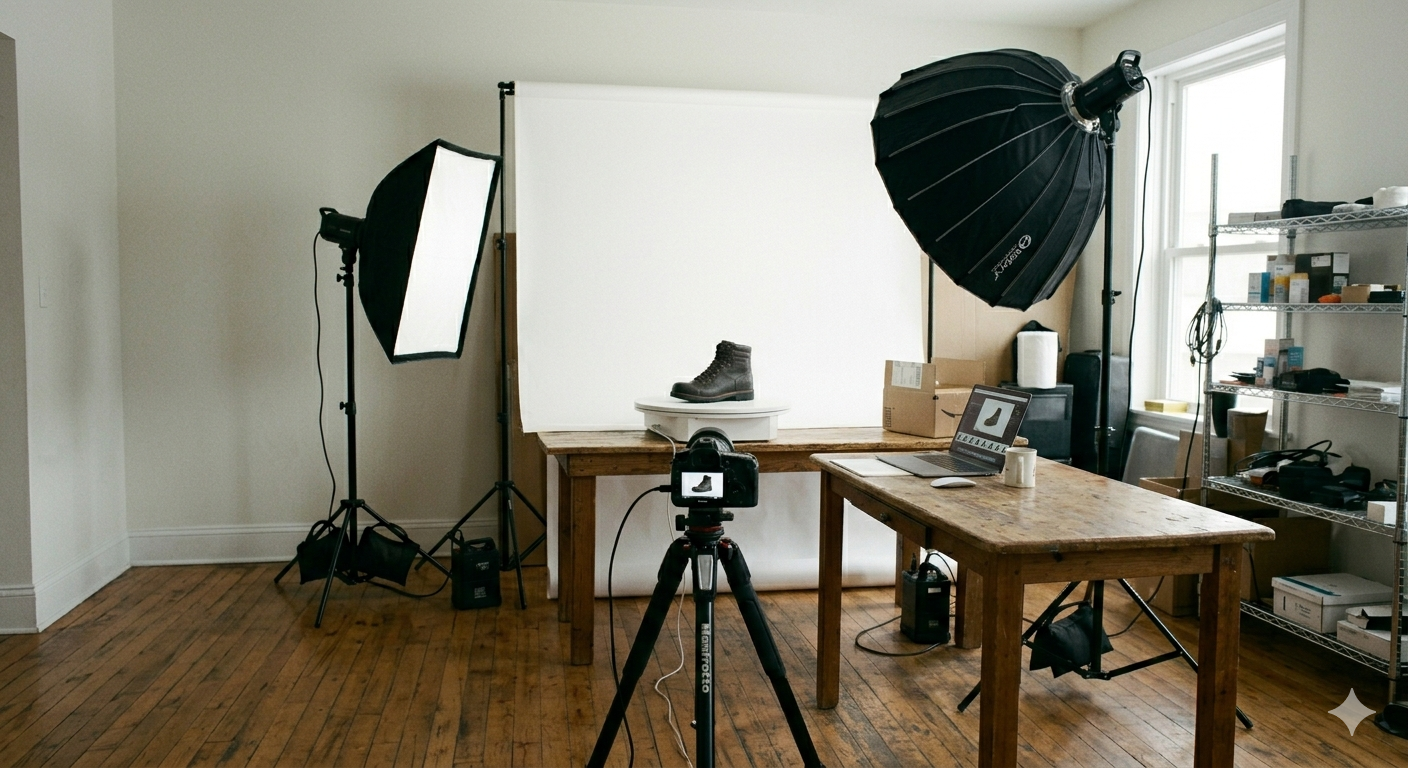
Step 2: Assemble Your 360 Capture Kit
Now that you know your platform requirements, it's time to build the setup that'll actually deliver consistent, stitch-ready frames. The good news: you don't need a Hollywood budget. The bad news: compromising on essential equipment can lead to costly reshoots.
The Turntable: Your Most Critical Investment
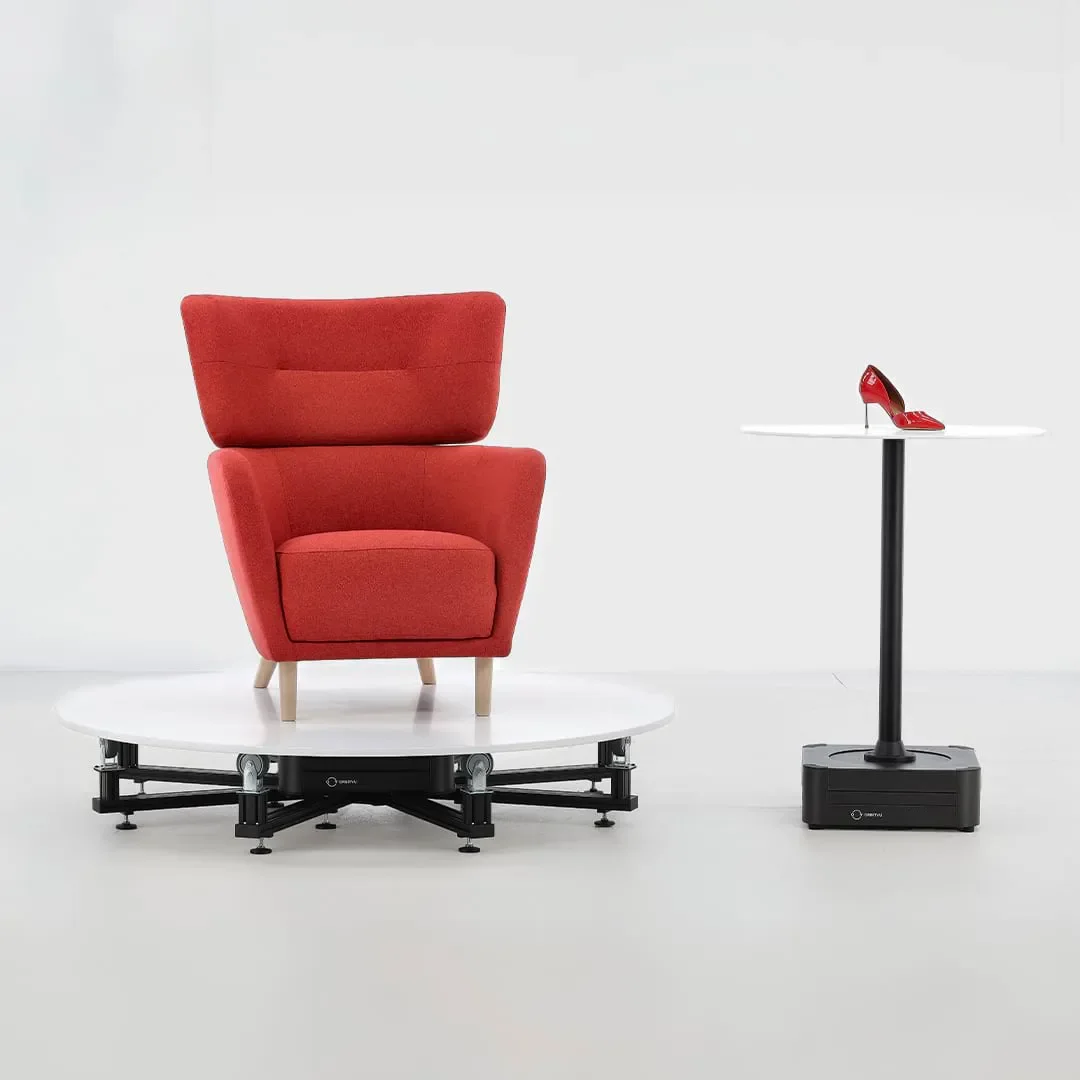
The turntable is the foundation of any 360 workflow. Manual turntables are affordable and work fine for low-volume shoots, but they require precise hand-rotation between frames — and human error adds up fast. Automated turntables eliminate that guesswork entirely. Solutions like Orbitvu and Photorobot streamline the full capture-to-stitch pipeline, making them the practical choice for any brand shooting at scale.
Lighting: Non-Negotiable Consistency
Consistent, shadowless lighting is the single biggest factor in clean stitching. A lightbox or a softbox tent with diffused, even illumination prevents harsh shadows from shifting between frames — which would make your final spin look choppy and unprofessional. Aim for a controlled environment where nothing changes shot to shot.
Camera and Software
DSLR or mirrorless cameras are the preferred choice for 360 product photography — but a modern flagship smartphone can produce platform-ready results for smaller catalogs.
For software, tools like WebRotate 360 handle both frame sequencing and output formatting — including exports optimized for a Shopify 360 product viewer integration. Getting comfortable with your stitching software before shoot day will save significant time in post-production.
With your kit assembled, the next challenge is executing the actual shoot — and that starts with understanding frame count and product centering. For detailed preparation tips, explore The 360 Advantage: Why Interactive Product Photography is the New Standard for High-Conversion E-Commerce.
Step 3: Execute the Shoot (The 24-72 Frame Sequence)
With your kit assembled, execution is where consistency separates professional interactive product images from amateur spin attempts. Getting this right means paying close attention to four variables: centering, frame count, lighting uniformity, and reflection control.
1. Centering the Product: Solving the "Wobble" Problem
The most common mistake in 360 shoots is a product that drifts off-center as the turntable rotates. Even a few millimeters of shift creates a jarring wobble in the final spin — an instant credibility killer. Before shooting, mark the turntable center with tape crosshairs and align your product to them. Shoot a test rotation and watch the edges carefully. If anything drifts, reposition and retest before committing to a full sequence.
2. Choosing Your Frame Count
Frame count directly determines how smooth your final spin feels. According to ProductPhotoEditing.com, 24 frames is the accepted minimum for basic web use, while 72 frames is the gold standard for a fluid, premium experience. For most mid-range product listings, 36 frames provide a good balance between file size and smoothness. Reserve 72-frame sequences for hero products where the browsing experience really matters.
3. Consistent Lighting Across All Angles
As the turntable rotates, ambient light can introduce subtle shifts in exposure and color temperature. Use a lightbox or controlled studio strobe setup to eliminate variables. Consistent lighting across every frame is non-negotiable — inconsistencies become very obvious once the images are stitched together.
4. Managing Reflections on Shiny or Transparent Products
Glossy packaging, chrome hardware, and glass bottles all introduce unwanted hotspots. Polarizing filters on your lens and light sources can cut reflections significantly. For transparent products, a light diffusion layer on your background prevents harsh blowout.
Once your frames are captured, the real transformation happens in post-production — where color consistency, background removal, and stitching bring the sequence to life.
Step 4: Post-Production and Image Stitching
Raw frames from your 360 spin photography session are only halfway to the finish line. Post-production is where consistency, compliance, and performance all come together — and where shortcuts tend to cost you conversions later. For pricing considerations and understanding ROI, see 360 Product Photography Pricing & ROI.
Batch editing is the non-negotiable first step. Process all frames simultaneously in Lightroom or your preferred editing tool using a locked preset. Even minor exposure drift between frames creates jarring "flicker" during the spin sequence, immediately signaling an amateur result to shoppers.
Background removal deserves particular attention for Amazon sellers. Pure white — exactly RGB 255, 255, 255 — is a hard platform requirement, and anything softer will likely trigger a listing suppression.
For file format, WebP is the clear choice for 360 viewers. It maintains high visual quality while significantly reducing file size, keeping mobile load speeds fast — a factor that directly affects bounce rate and conversion.
Consistent file naming and frame sequencing before you import into stitching software will save hours of troubleshooting downstream.
For stitching, two strong options are WebRotate 360 — well-suited for custom and DTC workflows — and Cappasity, which handles larger catalogs efficiently. Both output viewer-ready spin assets.
With your optimized, stitched files ready, the next step is getting them live on your storefront.
Step 5: Deploying Interactive Views to Your Storefront
All that careful shooting and stitching means nothing if your 360 spin photography never reaches a customer's screen. Deployment is the final hurdle — and getting it right across channels is what ultimately helps reduce e-commerce returns by giving shoppers the confidence to buy without second-guessing.
Amazon
For Amazon sellers, 360 animations can be uploaded directly through Seller Central's 'Manage Inventory' workflow — but only after Brand Registry is verified. Once enrolled, navigate to your product listing, select 'Upload Images,' and submit your spin sequence under the designated interactive asset slot. Amazon accepts the compiled animation file rather than individual frames, so ensure your post-production output matches their format specifications before uploading.
Shopify
Shopify's app ecosystem makes deployment relatively straightforward. Install a dedicated 360 viewer app from the Shopify App Store, configure the embed settings within your theme's product template, and upload your stitched image sequence. Most reputable viewer apps support lazy loading, which keeps page speed intact — a detail that matters for both SEO and conversion.
DTC and Custom Sites
For direct-to-consumer storefronts built on custom stacks, iFrame embeds or lightweight JavaScript viewers integrate cleanly into most CMS environments without heavy development overhead.
Mobile Testing
Regardless of platform, always test for mobile responsiveness and touch-swipe functionality before going live. The majority of product browsing happens on cell phones, and a spin viewer that performs poorly on iOS or Android undermines its effectiveness.
Deploying a polished interactive product experience is the step that transforms a photography investment into measurable business results. Begin with a single product, validate the workflow comprehensively, and then scale confidently.
Key Takeaways
Interactive imagery doesn't just drive conversions; it manages expectations — and managed expectations mean fewer "item not as described" returns.
360 product photography software
Platform requirements should drive your capture decisions
this feature is locked behind Brand Registry enrollment
3D models in GLB or USDZ format